- Created by Jason Shawn , last modified by Lori Hart on Feb 28, 2023
You are viewing an old version of this page. View the current version.
Compare with Current View Page History
« Previous Version 16 Next »
The Reports page allows the campus user to access all TestHound reports in one place.
Reports
Reports can be accessed by clicking on Reports in the Campus Management menu.
You can use the dropdown menu to select the report of choice and configuration options for each report. Reports for specific tests will give you the option to select the report type, administration, test, and sessions (MSS).

Designated Supports and Accommodations Reports
Click Here to View Pulling a Master Accommodations Report Video
Master Accommodations:
The Master Accommodations report allows the user to pull an accommodation report for all students in TestHound, or by specific test administrations, based on your chosen specifications. You can utilize the Test Admin: dropdown to run the master accommodations report for specific test administrations.
Note: Choosing different options on this report will act as a filter showing you only the students who meet the criteria you choose.
For a broader scope of students and accommodations, you can let the report run as it defaults, which is to all students, all subjects, all accommodation, or limit your filtered selections.
After selecting the Master Accommodations report, you will be able to configure the report for all or specific test administrations by selecting from the following categories:
Students: Choose by All accommodated, specifically 504, SPED, LEP designation, or all populations even those with no accommodations within a specified population.
Grades: Choose individual or multiple grades
Accommodation types: Specify the accommodation types you want to be included in your report
Test versions: Choose the test versions you want to be included in your report. If you do not select specific versions, all versions will be present in your report.
Subject(s): Choose individual or multiple subjects
Show notes associated with each student. Custom Notes are those added manually by the Campus Testing Coordinator in the notes box on the student accommodation page. AP notes are those added in Auto Pilot by the District Testing Coordinator. Vendor notes are those that come in automatically from the participating vendors. (not all vendors send notes). Checking these boxes will ensure the notes appear in the report.

The report can be generated and export it to Excel, PDF, or Word. It is recommended that this report be exported to Excel since it is already set up in a spreadsheet (matrix) format.
The report has a signature line at the bottom to assist in the verification process.
It is important to not select "students with no accommodations" and "All Accommodations" at the same time. Also, it is important to note that this is a dynamic report. When an option such as STAAR ALT2 is not available as a checkable field under test version, it means no student has been assigned that test type.
Room Accommodations:
The Room Accommodations report allows the user to pull an accommodation report by room for a specific test within a test administration that shows student accommodation information. This report will also contain the test version and population (504, SPED, LEP) information. You will be able to configure your report similar to the Master Accommodations report by selecting from several options:
Format: Individual (this format will only show the accommodated students in each testing room) or Matrix (same format as the Master Accommodations report)
Test administration and test
Room: All rooms or a specific room
Accommodation Type: Select the accommodation types you want to be represented in your report
Show Notes associated with each individual student. Custom Notes are those added manually by the Campus Testing Coordinator in the notes box on the student accommodation page. AP notes are those added in Auto Pilot by the District Testing Coordinator. Vendor notes are those that come in automatically from the participating vendors. (not all vendors send notes). Checking these boxes will ensure the notes appear in the report.

Material Control:
The Material Control report allows the user to pull test room rosters/materials control for a specific test within a test administration. There is a seating chart on this report as well as a roster of students, booklet information, and attendance information.
After selecting the Material Control report, you will be prompted to select a test administration from the Select Admin drop‐down menu.
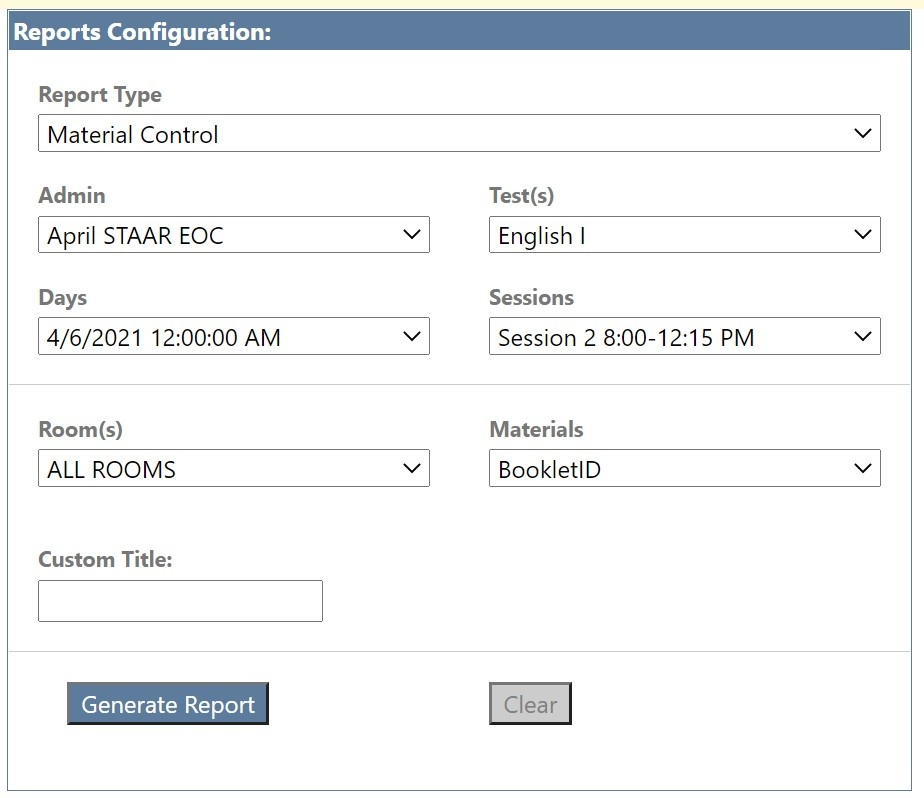
After selecting the test administration, you will need to select a test from the Select Test drop‐down menu. Once all selections are complete, click Generate Report.
To export the data to either excel, PDF, or word, click the blue floppy disk icon.
This report also supplies the CTC with a seating chart, a place to mark students present/absent, and a place to indicate if students need to be relocated during testing. The CTC will also be able to utilize the report to identify the following:
The test administration
The test subject
The date of the test
The room
The test administrator(s) assigned to the room and any associated materials if issued to students
The name of each student assigned to the test room including student ID
The student’s test version
The test booklet number assigned to each student
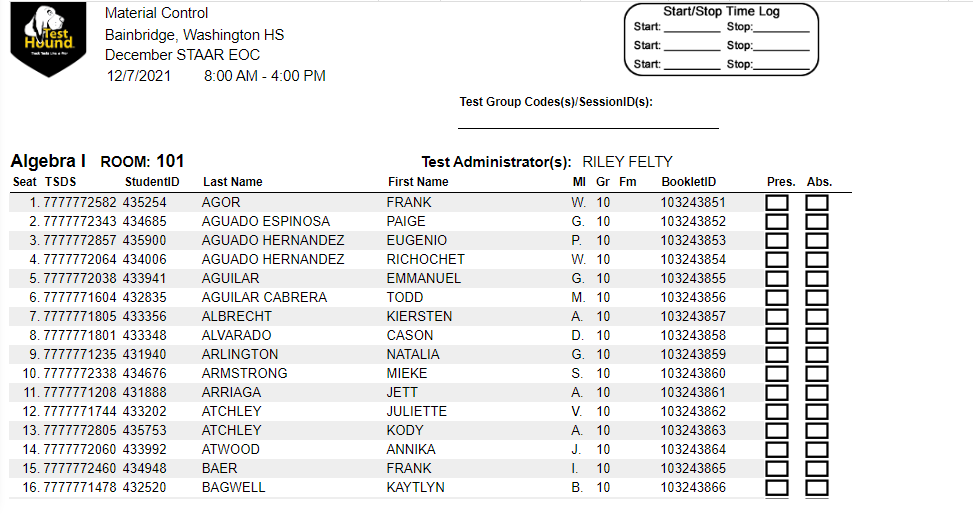
This report can be used for the following functions:
Materials control form: All test booklet numbers are identified and there is a signature line for both the test administrator and the test coordinator
Attendance
Directions for completing the seating chart
Master Schedule:
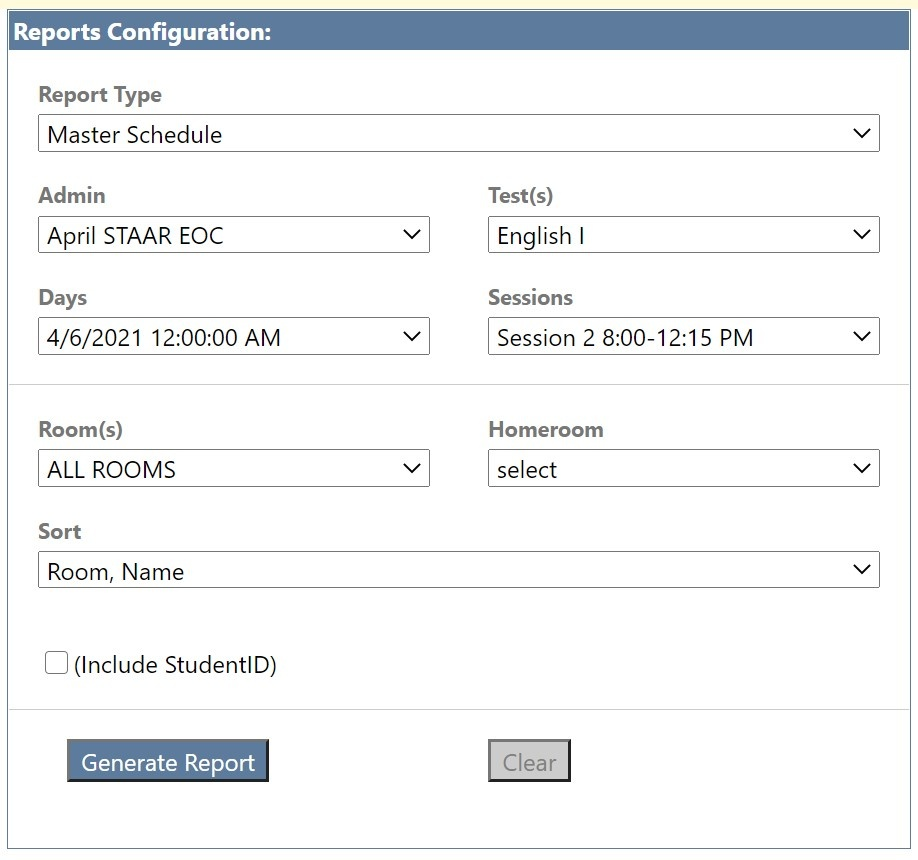
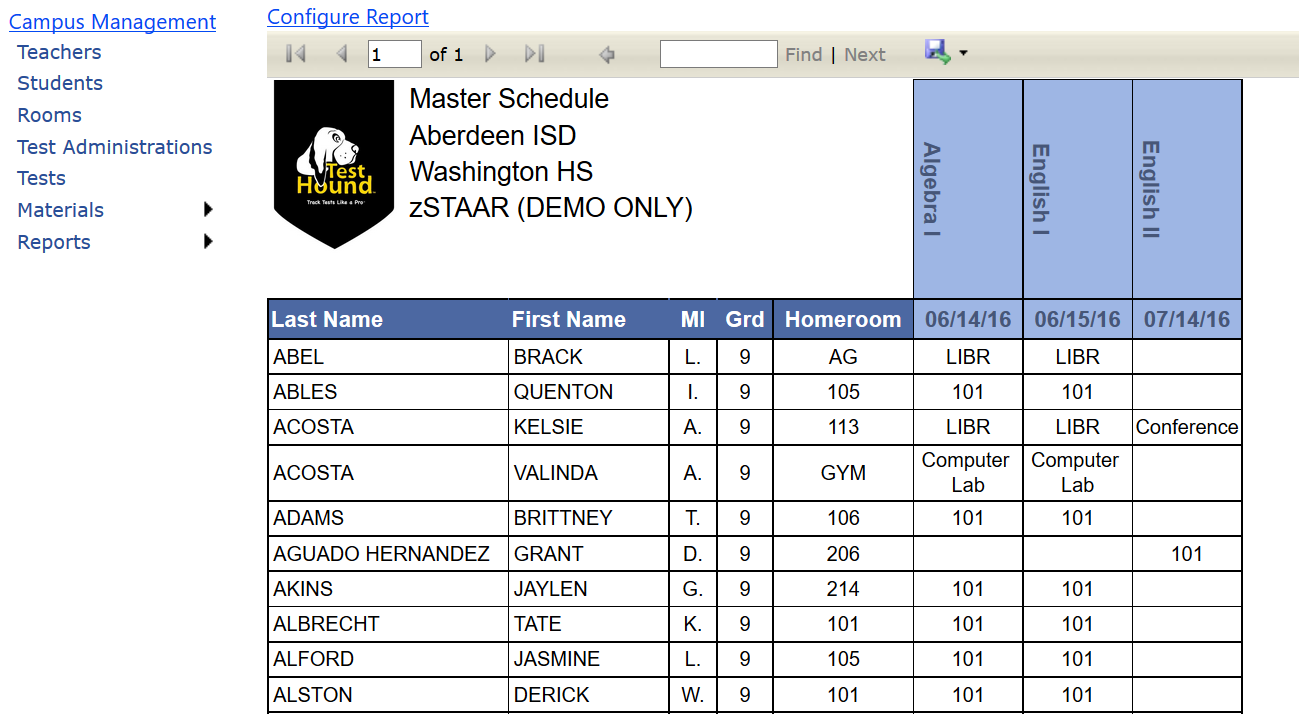
The Master Schedule report allows the user to pull a list of students and the rooms they will be assigned to during a test administration. The report can then be posted for students to find where they are assigned to for testing each day. After selecting the Master Schedule report, you will generate your report to include the following:
Test administration
The specific test within the administration: All Tests is the default, however, you may choose a specific test being administered (i.e. Alg. I)
Homeroom (if selected) – based on schedule data uploaded by the district user
Sort students by room and name or name only
Include Student ID (default): You may configure your report by unchecking the Student ID box
Once all selections are complete, click Generate Report.
A report will be generated with a list of students and the test room they are to report to during the test administration window. To export the data to either excel, PDF, or word, click the blue floppy disk icon.
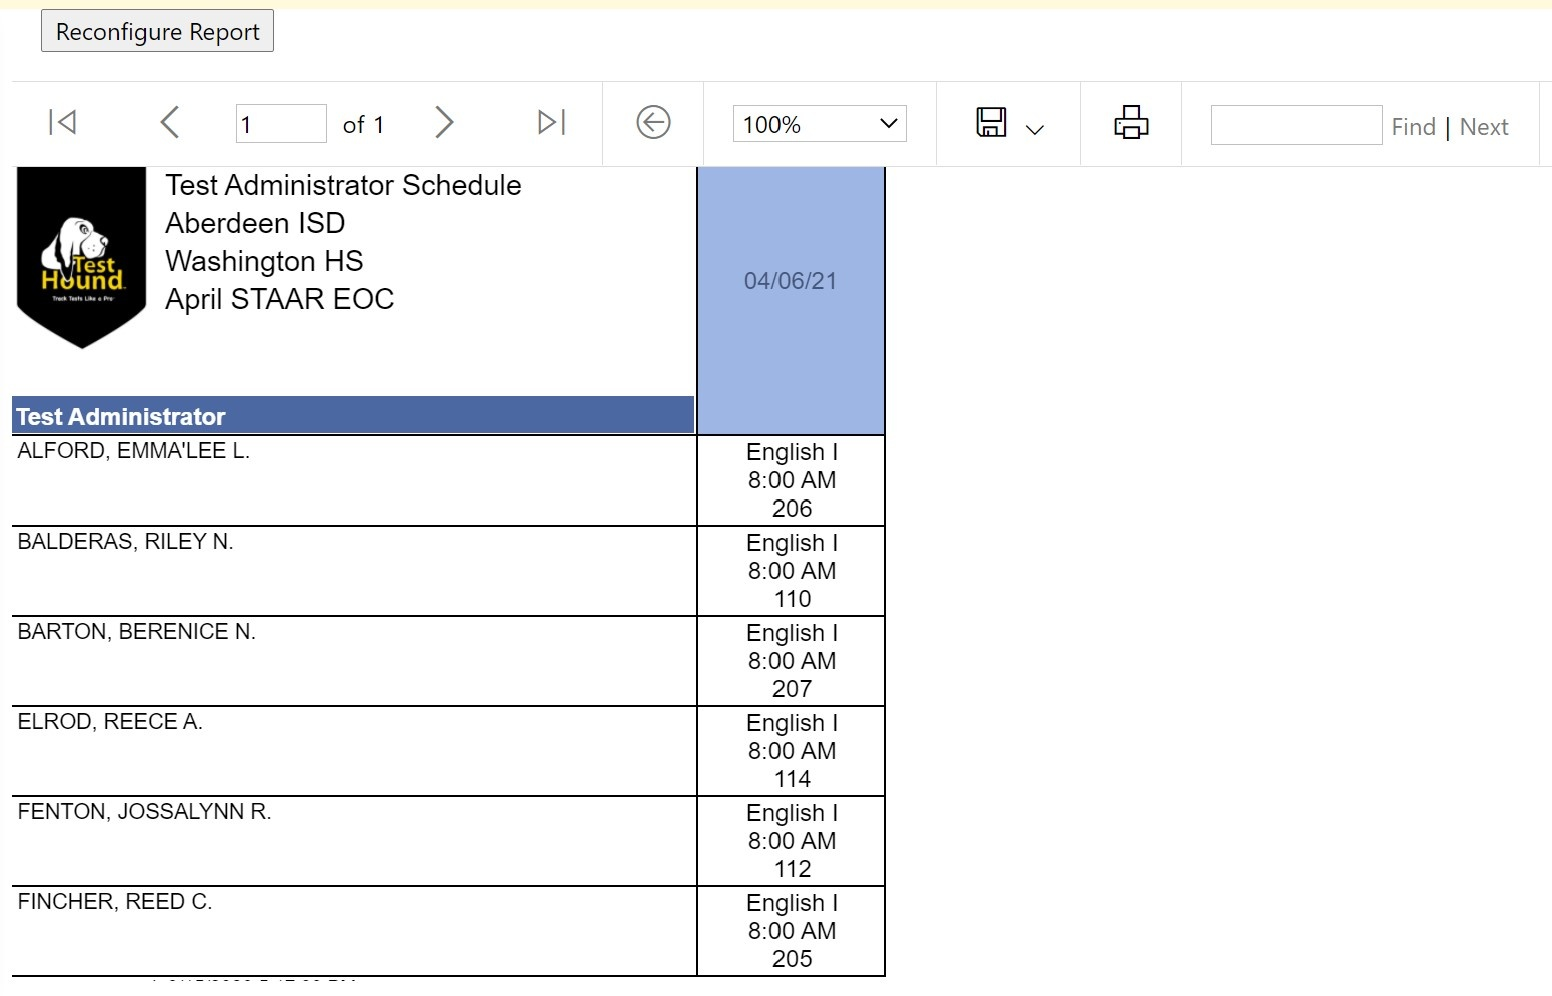
Test Administrator Schedule:
The Test Administrator Schedule works similarly to the Master Schedule report in that this report allows the user to pull a list of test administrators and the rooms they will be assigned to during a test administration. After selecting the Test Administrator Schedule report, you will be prompted to select the following:
Test administration
Test: All Tests is the default, however, you may choose a specific test being administered (i.e. Alg. I)
Once all selections are complete, click Generate Report.
A report will be generated with a list of teachers and the test room they are to report to during the test administration window. To export the data to either excel, PDF, or word, click the blue floppy disk icon.
Master Materials:
The Master Materials report allows the user to generate a report identifying the material type, range, and quantity assigned to each room and test administrator during a test administration. The report will also provide a location for materials to be signed out at the beginning of testing and back in when testing is finished. After selecting the Master Materials report, you will be prompted to select the following:
Test administration
Test
Custom title
Rich text editor: The user may either compose or paste instructions within the text box. Entering text in the Instructions box is not required to generate the report.

The report includes the following information for each test:
rooms
test administrators
materials groups: barcode ranges and quantities, if assigned to students
boxes for signing materials out and it
Note: If no booklets have been assigned indicating an online testing room, that will be noted on the form.

Click Configure Report if you need to make any changes. Your report can be exported to Excel, PDF, or Word by clicking on the Floppy Disk icon at the top of your report preview box.
Room Labels:
The Room Labels report allows the user to print a label that can be placed on each test booklet. Since the test booklets have been assigned to specific students, the Room Labels can be printed to ensure each student receives the appropriate test booklet. After selecting the Room Attendance report, you will be prompted to select the following:
Test administration
Test
Individual room or all rooms included in the test
Click Generate Report. Your report will appear in a preview window.

Each label will contain the student’s name, room assignment, booklet number, test, and grade.
It is important to export this report to PDF, use Avery 5160 address labels, and note that when this report is printed, you should make sure that your computer doesn’t have “Shrink to Fit”, “Fit to Page”, etc. selected before clicking Print.
Boxed Booklets:
The Boxed Booklets report allows the user to print a report which identifies the specific secure test material scanned into each box.
After selecting the Boxed Booklets report, you will select:
-Test Administration
-Box that you want to be included
You will then be able to generate a report showing every included booklet. Once all selections are complete, click Generate Report. To export the data to either excel, PDF or word, click the blue floppy disk icon inside the beige bar.

PT Summary Report:
The PT Summary Report allows the user to view by EOC then select all grade levels or view one at a time. This report is available for EOC students. The highest score data or exclusion data is reported for EOC students. The report can also be run for 3-8 students after score data has been uploaded for the current year. The 3-8 report currently does not track data from the previous year.
Make the selection, then Generate Report. To export the data to either Excel, PDF, or Word, click the blue floppy disk icon inside the beige bar.

Score Information:
NM Not Met Standard
MET Met Standard
SC-A Score Code Absent
SC-O Score Code Other
Exclusions:
ALT STAAR ALT2
ARD EOC ARD Exempt Decision
CBE Credit-By-Exam
E1 LEP English I Special Provision LEP
FEX Foreign Exchange
IGC Individual Graduation Committee
OOS Out of School/Private School
SA Substitute Assessment
WVR20 Waived COVID
TestHound offers reports to help you interface with the Cambium/TIDE testing platform to manage testing information for students.
NOTE: The district testing coordinator can also run these reports, so it may be necessary to coordinate where they will be managed.
Your district coordinator will register students for each test administration in TIDE. Once they are registered, these additional reports will help you in managing the other aspects of the test.
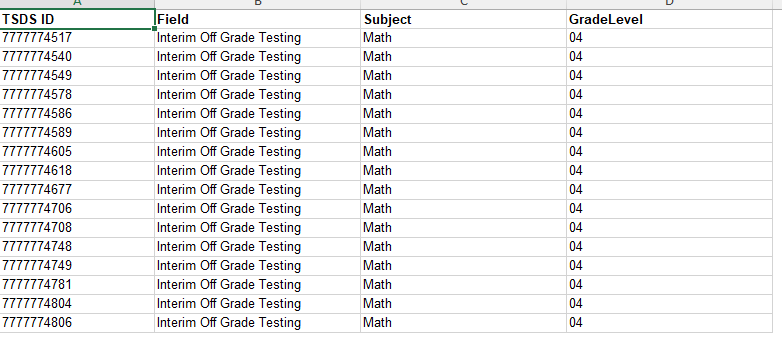
Interim Above Grade Level/EOC: this report is for the Interim tests . For 3-8 students, the above grade report will flag the student with the off grade level code. Students should be added at the campus to the correct test they will actually take. TestHound will compare this to the student’s enrolled grade and mark the off grade level code in the report to be uploaded to TIDE. The screenshot below shows 16 third grade students who were added to the 4th grade math test. For EOC, the student will be flagged for Interim EOC test they are assigned to.
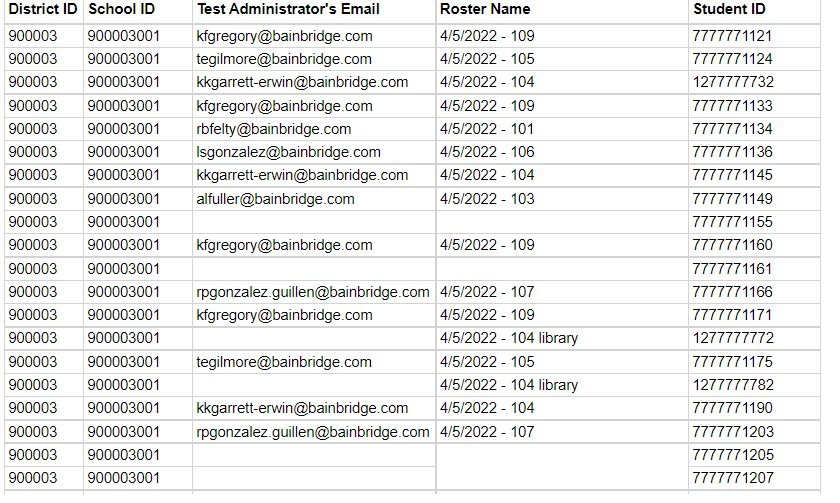
TIDE Roster- This report allows you to upload to TIDE all the students in the test and their room assignments for testing. This will enable you to print your test tickets in TIDE by room number. It will also tie the test administrator to the room for reporting purposes. Note: This report does NOT create the TIDE session for you.
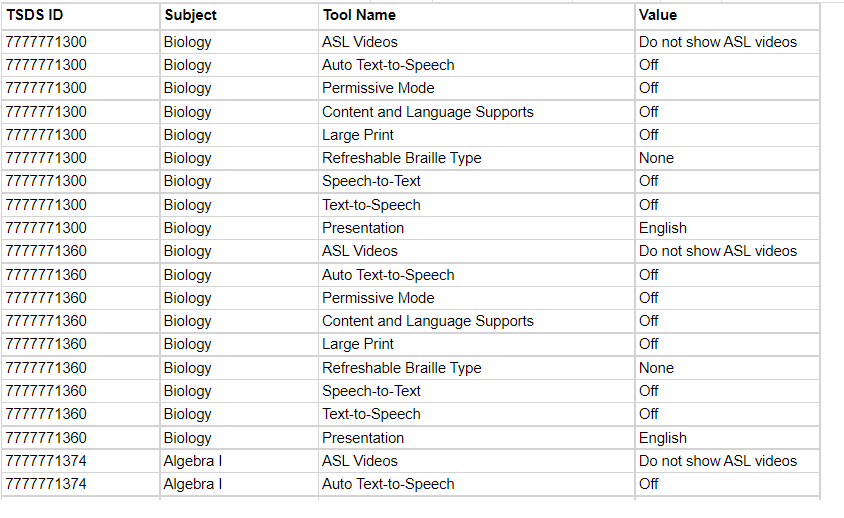
Test Attributes- this report will allow any student who has an online accommodation, to have that turned on for them in the TIDE testing platform. It is important that all accommodation information is verifed and all auto pilot alerts accepted at the campus before running this report.
Non Embedded Supports this report will be uploaded to TIDE to track students who have some other non embedded support other than the online supports included in the attributes report. It does not track specifically what the support is, only what is required by the state.

STAAR Above Grade Level: This report will include STAAR 3-8 students who are testing above grade level. Students should be added to the test they will actually take and TestHound will compare that to the enrolled grade and flag the above grade column.

- No labels