Performance Tracker allows you to upload current STAAR and historical student score data files, generate Student Data Requests (SDR) files, and generate registration files.
...
Performance Tracker allows you to upload current STAAR and historical student score data files, generate Student Data Requests (SDR) files, and generate registration files.
...
| Expand | ||
|---|---|---|
| ||
Performance Tracker will allow the creation of the SDR (Student Data Request) file that will capture test history for students who tested outside of your district. **For returning districts, accepting campus student alerts before generating an SDR file, will ensure all students are at the correct campus and lessen the number of students potentially in your errors file.** **Cambium requires that all students be “registered” in TIDE before they will release score data. You can use the “all student registration” file to upload to TIDE before you do an SDR. See the question “How Can I Generate a Registration file”. Upload the all student registration file and allow it to process before submitting an SDR to Cambium. When you are ready to generate an SDR: In Performance Tracker, click Generate SDR.  A new window will open giving you the option of pulling the SDR for only your flagged students ( your new students, students who have re-enrolled, or students without scores in TestHound) OR you can pull an SDR for ALL of your students in the event you feel that you have some students whose scores did not populate when pulling the SDR at a previous time. You may also select the the ALL grades option or the specific grade level(s) you choose to include.   When the file has been downloaded, you can open it and view. Depending on your version of window you may get a Don’t Convert option, which means you can open the file and it will keep the zeroes. If your computer version does not offer this option you may want to right click and make a copy of the file first and save it. Then you can view the copy and upload the unopened copy to TIDE. This way you have an unopened copy that will retain the zeroes. The file will be the pre-formatted SDR file that can be submitted in TIDE to retrieve test data for students. Save the file to your computer. Once you have your SDR file saved that you generated in TH.
Once Cambium processes the SDR file, they will return scores to you in your secure inbox in their system. You can open the zip file, extract all the files and then upload them to Performance Tracker using the Upload Data link. (HINT-don’t upload TELPAS files) . Be sure to use the right Data Set for the year and type of scores (EOC or 3-8). For a complete record of ALL students' scores, A score file should also be uploaded after results from each test administration are received to keep performance history current. |
| Expand | ||||
|---|---|---|---|---|
| PT+Grade+Level+with+Download+New+Feature||||
Performance Tracker will allow the creation of the SDR (Student Data Request) file that will capture test history for students who tested outside of your district. **For returning districts, accepting campus student alerts before generating an SDR file, will ensure all students are at the correct campus and lessen the number of students potentially in your errors file.** **Cambium requires that all students be “registered” in TIDE before they will release score data. You can use the “all student registration” file to upload to TIDE before you do an SDR. See the question “How Can I Generate a Registration file”. Upload the all student registration file and allow it to process before submitting an SDR to Cambium. When you are ready to generate an SDR: In Performance Tracker, click Generate SDR. A new window will open giving you the option of pulling the SDR for only your flagged students ( your new students, students who have re-enrolled, or students without scores in TestHound) OR you can pull an SDR for ALL of your students in the event you feel that you have some students whose scores did not populate when pulling the SDR at a previous time. You may also select the the ALL grades option or the specific grade level(s) you choose to include. When the file has been downloaded, you can open it and view. Depending on your version of window you may get a Don’t Convert option, which means you can open the file and it will keep the zeroes. If your computer version does not offer this option you may want to right click and make a copy of the file first and save it. Then you can view the copy and upload the unopened copy to TIDE. This way you have an unopened copy that will retain the zeroes. The file will be the pre-formatted SDR file that can be submitted in TIDE to retrieve test data for students. Save the file to your computer. Once you have your SDR file saved that you generated in TH.
Once Cambium processes the SDR file, they will return scores to you in your secure inbox in their system. You can open the zip file, extract all the files and then upload them to Performance Tracker using the Upload Data link. (HINT-don’t upload TELPAS files) . Be sure to use the right Set for the year and kind of scores (EOC or 3-8). For a complete record of ALL students' scores, A score file should also be uploaded after results from each test administration are received to keep performance history current. | ||||
| Expand | ||||
|

| Expand | ||
|---|---|---|
| ||
How Do I Know What Data Set to Choose for Performance Tracker? SDR files and Score reporting files are named in a way that will identify the year the data is associated with. Files beginning with SF and Production Examinee are valid files to load. The first part of the SDR file name begins with SF. The second string is the test administration + YY. The first 2 are the admin (13=fall, 15=spring, 16=summer) the last 2 are the year. Next, the file name will identify if it is an EOC or a 3-8 score file. For example, SF_1616_EOC_A1 is the Summer of 2016 EOC score for Algebra 1.  Important here is the last 2 digits in that 4-digit number, that’s the year. This indicates the data type selection that needs to be made when uploading the file into TestHound. SDR files for grades 3-8 scores are listed as the month and year. SF_0519 would be in May of 2019. So again, the last 2 digits are what you look for. |
| Expand | ||
|---|---|---|
| ||
To Batch Upload Score Files, click on the Performance Tracker tab in your District Management Menu and select Upload Data. A new window will open. 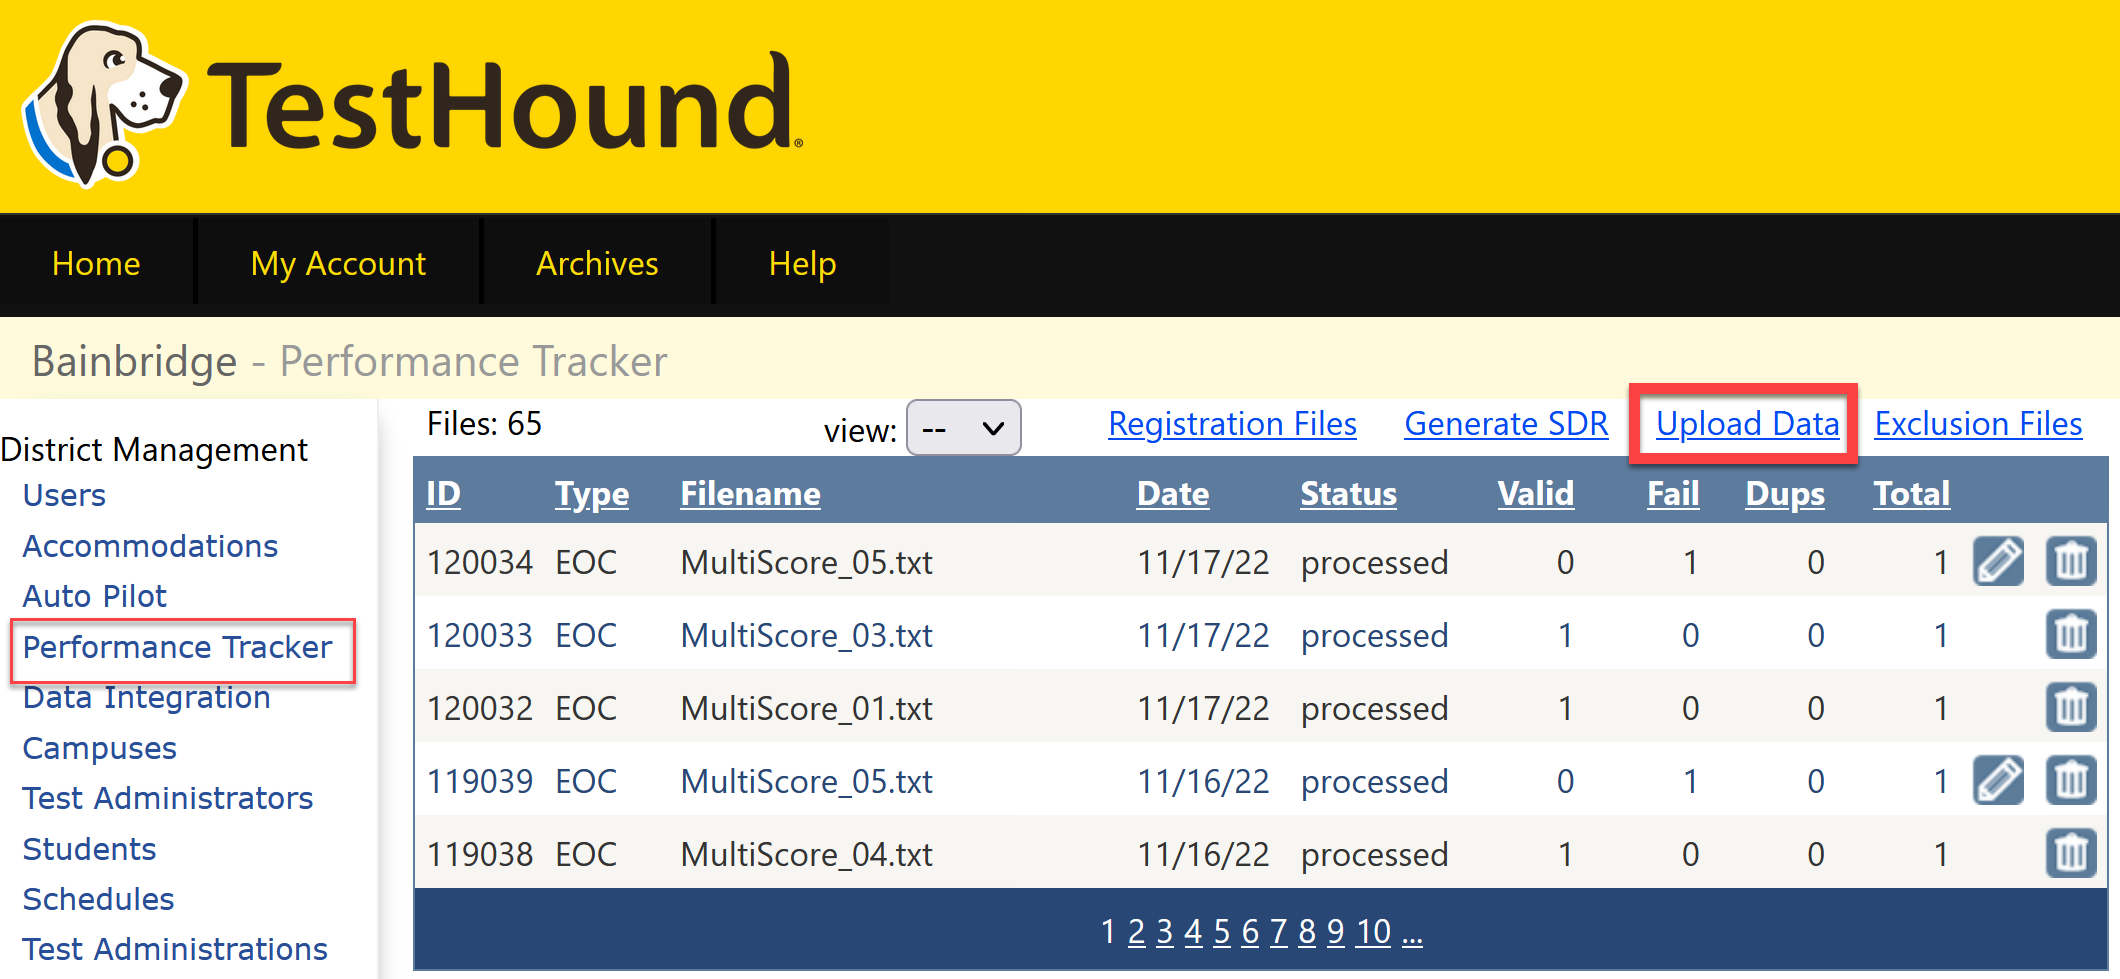 Next, using the name of the file, select a Data Set. For EOC files, find the 4 digit numerical code in the file name, which will tell you the admin and the year of the scores. EX: 1522 is Spring of 2022. 1320 is Fall of 2020.( For your reference, 13-Fall/Dec., 15-Spring, 16-Summer and the last 2 digits are the year.) 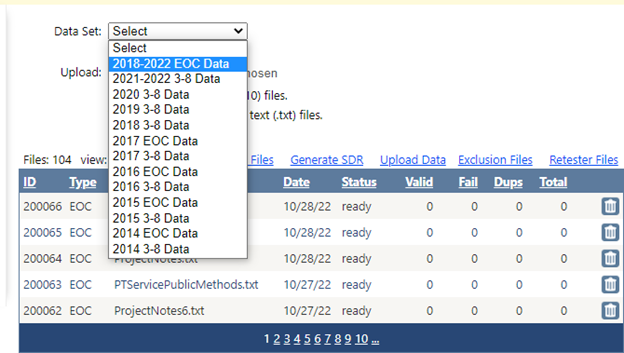 Then select the “Choose Files” button. 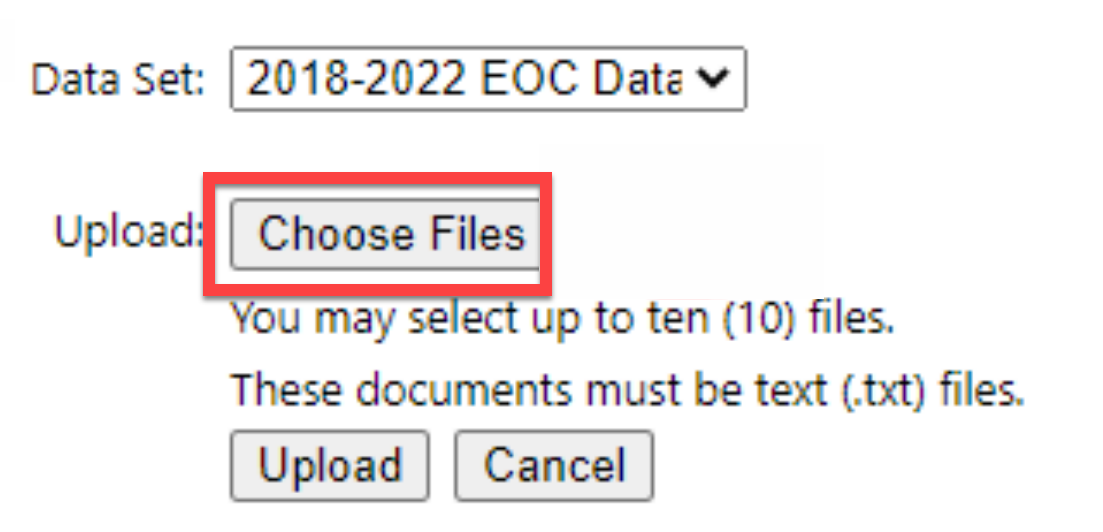 *Be sure to choose only .txt files. A maximum number of 10 files may be selected and processed per batch. To select multiple files for your batch, hold the ctrl button on your keyboard while selecting multiple files from your computer. All files chosen in the batch must match the same data set. Next, select the “Open” button. The selected file count will be displayed. NOTE: You can’t upload the zip file from the vendor. You must open it and download all the individual files inside, then upload those, in batches of 10, to Performance Tracker. 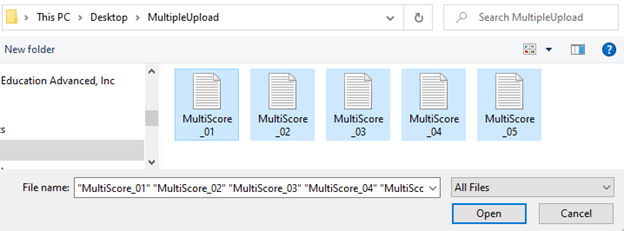 Then select the “Upload” button to upload your files. 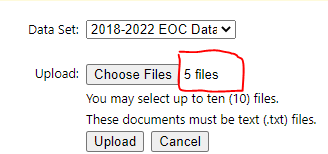 After uploading, you will receive an email when the files have been processed. Each file will be displayed in your Performance Tracker table and show a status of ready. You do not have to wait for one batch to process before uploading the next batch. 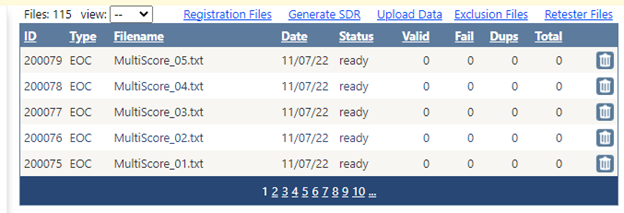 Once the files are processed they will show a processed status in the table. 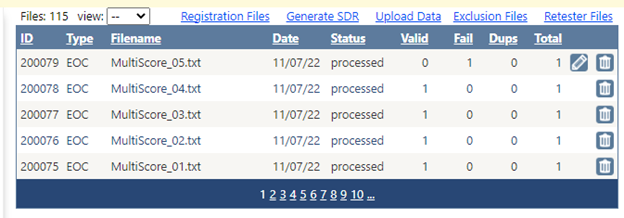 NOTE: When EOC data files are uploaded, Performance Tracker will pull in the cumulative test data records. |
...
| title | What happens after I upload a STAAR or SDR file? |
|---|
After the file has been uploaded, a table will appear with the status of the file. Initially, the status will be "received" and when complete will change to "processed". The table will also indicate Valid records (records where test data was successfully matched) and Failed records (records where data was unable to be matched).
After the file has completed processing, a new table will appear with the names of students for whom test data has been associated.
...
Initially, 5 students will be shown. You may search for a student by typing in the local ID or to view additional students, choose 10, 25, or All from the View drop‐down menu.
By choosing Select next to a student’s name a table will appear to display the test data by subject or EOC course associated with the student.
...
If a student did not have a score code of "S" the cell with the student data will now reflect the score code that was assigned to the student and the box will be highlighted gray. For instance, a student with a score code of "A" will have SC-A displayed, or a score code of "O" will be displayed as SC-O.
...
| Expand | ||
|---|---|---|
| ||
A failed lookup is the result of a failed association between the State ID in the data file uploaded and the State ID in the demographic file submitted by the district. The most common reason this occurs is that the State ID may be inaccurate in one of the two files or the student is no longer enrolled in the district and the student's data is not being submitted via the demographic file. To update failed lookups, select the Validate Failed Lookups icon (pencil).  A list of students with failed lookups will appear. If you know the student’s local ID you may type it in the text box and click GO to associate the test data to the student. Doing this will associate the data using the local ID instead of the State ID.  |
| Expand | ||
|---|---|---|
| ||
The file can be deleted along with the associated scores if it was uploaded improperly. To do so, select the Delete File and Scores button.  A new window will open stating that if the file is deleted it will also delete associated scores data. If you wish to proceed select Submit.  |
...
| title | Registration File Frequently Asked Questions (F.A.Q.) |
|---|
Do student alerts need to be approved at the campus level for students to be included in the Registration file? Yes
If students do not have a past performance score in TestHound, First, add the students to the test administration at the campus level, then run the registration file at the district level. Any students in the test will be included in the file.
...
Do you have to map any courses for the December EOC? Only if you want to include a specific course code class for the test administration, otherwise it will include Retesters only based on scores loaded for students and any students assigned to the test.
How do you identify 3-8 above-grade testers? The STAAR Above Grade Level Report can be run after students have been added to the test administration at the campus level.
Will students with a Score-O or Score-A be included in the Registration file? Yes, they will be included.
| Expand | ||
|---|---|---|
| ||
Once the registration file is generated it can be opened and manually edited as needed. PLEASE NOTE when the registration file is opened to make changes, any leading zeros will be dropped if they are present within columns in Excel. Those leading zeros will need to be added back if any are removed in order for the file to successfully process. Please follow the steps below as needed to return any leading zeros: Highlight the entire column that contains data where leading zeros would need to be added Right-click in the highlighted area and choose Format Cells In the Category, select Custom  In the Type section, the word General will be in a text box, and also highlighted underneath Click inside the text box (NOT the field with the items listed), delete out the word General and type in as many zeros as the field should contain. These act as a placeholder for the number of characters needed in the field.
Once the updates are completed, save your document as .csv and then proceed with uploading the file for student registration. |
| Expand | ||
|---|---|---|
| ||
| Expand | ||
| ||
Utilizing TestHound with TIDE system/Reports STAAR 3-8 and STAAR EOC Assessments *Verify the Accommodation Associations have been configured. To properly identify paper-based and computer-based test-takers and accommodations, the Accommodation Association must be configured to properly generate the Registration file and Test Attribute/Accommodation Report. All Student Registration File Click Here for a Video on How to Pull a Students Registration File  If you are not using Performance Tracker to pull the registration file, you can add the EOC flags to students using the Eligibility reports offered under district reports. Students must be in a test for the report to generate.  Test Attributes/Accommodations Report Students must be in a test in the system for this report to generate. Under District Management, go to Reports, select Test Attributes, click Request Test Attributes, choose Administration, and format=Test Attributes, then hit Request.     This report is for state assessments From the district level, if a new attributes report needs to be run for a test administration, delete the original file and select Request Test Attributes to re-run the file. generation of a registration file that is uploaded to the state testing vendor to register students in TIDE. The “All Student Registration“ file will allow you to upload all your TestHound students into TIDE for ease in pulling a Student Data Request in Cambium to obtain past student test performance. The “All Student Registration” file will not register students for testing. It simply adds your students to the Cambium system. You can also generate an “All Students with Test Registrations” file. This will automatically flag students for test registration. Students do NOT need to be in a test in TestHound. (Campuses should process all student alerts (new, unenrolled, reenrolled) prior to this, to ensure student statuses are updated. ) This new process will pull all students in grades 3-8 in TestHound into the file based on enrolled grades. TELPAS students will be registered for TELPAS testing based on their current EL status, and STAAR Alt students will be included based on SPED indicator Yes, and STAAR Alt accommodations designated on their Accommodation page in TestHound. Retesters will be included using their performance history in Performance Tracker. Students who need to retest but do not have a performance history in TestHound can be added to the appropriate test in TestHound and then will be included in the file. STAAR 3-8 above grade level testers will need to be added to the appropriate test and then the Above Grade Level Report can be run to capture the above grade level status and uploaded to TIDE. EOC students and STAAR ALT EOC students will be added for EOC registration based on the Course Association that will need to be performed by the district in the Schedule menu, Course Assoc. tab.  Mapping each course required to take each test will ensure that the appropriate students are included in the registration file. Click the + on the right to add each course associated with that particular EOC test. Be sure to do all 5 Spring EOC courses and the STAAR Alt2 EOC courses as well. Map all courses including any Honors, AP, Dual Credit, etc. that would require the students to take the test. Courses with the same course number will only show to be mapped once. For detailed directions on the course, mapping click Here: How do I map EOC courses for Test Registration To generate a registration file, click Performance Tracker, and select Registration Files. IF YOU HAVE PREVIOUSLY GENERATED A FILE, YOU WILL NEED TO DELETE IT TO REQUEST A NEW ONE.  Click Request Registration 
Select “All students with Test registration”. The file will begin to generate and you will receive an email when it is ready. You can return to the Registration page to download your file once it has been processed. Once appropriate selections have been made, choose Request.  Files are processed in a queue and the length of time to generate the file depends on the size of the district and the number of requests ahead of the file in the system.  When the email is received with the notification of the registration file being ready, select Performance Tracker > Registration Files. A window will appear with the files that have been requested. Select the Download icon next to the appropriate file.  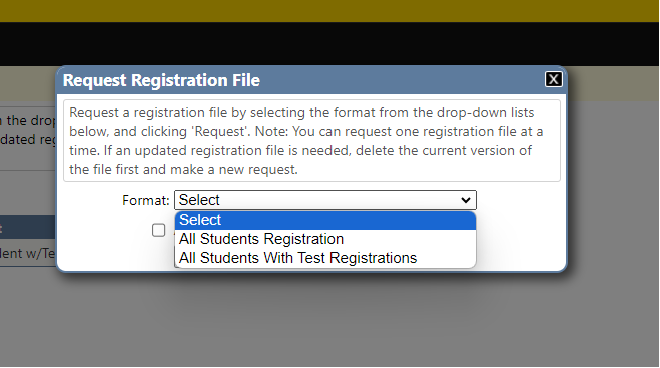 The downloaded file will be the registration file that can be submitted to the vendor to register students for testing. IN TIDE, click on Student Information, choose Upload Student Information, click CHOOSE FILE to find your file and upload it. Once it processes, if you are requesting scores for students, follow this procedure with the SDR procedure also here on the PT help page. |

| Expand | ||
|---|---|---|
| ||
How Do I Know What Data Set to Choose for Performance Tracker? SDR files and Score reporting files are named in a way that will identify the year the data is associated with. Files beginning with SF and Production Examinee are valid files to load. The first part of the SDR file name begins with SF. The second string is the test administration + YY. The first 2 are the admin (13=fall, 15=spring, 16=summer) the last 2 are the year. Next, the file name will identify if it is an EOC or a 3-8 score file. For example, SF_1616_EOC_A1 is the Summer of 2016 EOC score for Algebra 1. Important here is the last 2 digits in that 4-digit number, that’s the year. This indicates the data type selection that needs to be made when uploading the file into TestHound. SDR files for grades 3-8 scores are listed as the month and year. SF_0519 would be in May of 2019. So again, the last 2 digits are what you look for. |
| Expand | ||
|---|---|---|
| ||
To Batch Upload Score Files, click on the Performance Tracker tab in your District Management Menu and select Upload Data. A new window will open. Next, using the name of the file, select a Data Set. For EOC files, find the 4 digit numerical code in the file name, which will tell you the admin and the year of the scores. EX: 1522 is Spring of 2022. 1320 is Fall of 2020.( For your reference, 13-Fall/Dec., 15-Spring, 16-Summer and the last 2 digits are the year.) Then select the “Choose Files” button. *Be sure to choose only .txt files. A maximum number of 10 files may be selected and processed per batch. To select multiple files for your batch, hold the ctrl button on your keyboard while selecting multiple files from your computer. All files chosen in the batch must match the same data set. Next, select the “Open” button. The selected file count will be displayed. NOTE: You can’t upload the zip file from the vendor. You must open it and download all the individual files inside, then upload those, in batches of 10, to Performance Tracker. Then select the “Upload” button to upload your files. After uploading, you will receive an email when the files have been processed. Each file will be displayed in your Performance Tracker table and show a status of ready. You do not have to wait for one batch to process before uploading the next batch. Once the files are processed they will show a processed status in the table. NOTE: When EOC data files are uploaded, Performance Tracker will pull in the cumulative test data records. |
| Expand | ||
|---|---|---|
| ||
After the file has been uploaded, a table will appear with the status of the file. Initially, the status will be "received" and when complete will change to "processed". The table will also indicate Valid records (records where test data was successfully matched) and Failed records (records where data was unable to be matched). After the file has completed processing, a new table will appear with the names of students for whom test data has been associated.  Initially, 5 students will be shown. You may search for a student by typing in the local ID or to view additional students, choose 10, 25, or All from the View drop‐down menu. By choosing Select next to a student’s name a table will appear to display the test data by subject or EOC course associated with the student.  If a student did not have a score code of "S" the cell with the student data will now reflect the score code that was assigned to the student and the box will be highlighted gray. For instance, a student with a score code of "A" will have SC-A displayed, or a score code of "O" will be displayed as SC-O.  |
| Expand | ||
|---|---|---|
| ||
A failed lookup is the result of a failed association between the State ID in the data file uploaded and the State ID in the demographic file submitted by the district. The most common reason this occurs is that the State ID may be inaccurate in one of the two files or the student is no longer enrolled in the district and the student's data is not being submitted via the demographic file. To update failed lookups, select the Validate Failed Lookups icon (pencil). A list of students with failed lookups will appear. If you know the student’s local ID you may type it in the text box and click GO to associate the test data to the student. Doing this will associate the data using the local ID instead of the State ID. |
| Expand | ||
|---|---|---|
| ||
The file can be deleted along with the associated scores if it was uploaded improperly. To do so, select the Delete File and Scores button. A new window will open stating that if the file is deleted it will also delete associated scores data. If you wish to proceed select Submit. |
| Expand | ||
|---|---|---|
| ||
Do student alerts need to be approved at the campus level for students to be included in the Registration file? Yes If students do not have a past performance score in TestHound, First, add the students to the test administration at the campus level, then run the registration file at the district level. Any students in the test will be included in the file. If in the Course Association, if two different course names have the same course code number, can they both be mapped?No, they cannot both be mapped, but they will both pull into the registration file as the course code number was mapped. Do you have to map any courses for the December EOC? Only if you want to include a specific course code class for the test administration, otherwise it will include Retesters only based on scores loaded for students and any students assigned to the test. How do you identify 3-8 above-grade testers? The STAAR Above Grade Level Report can be run after students have been added to the test administration at the campus level. Will students with a Score-O or Score-A be included in the Registration file? Yes, they will be included. |
| Expand | ||
|---|---|---|
| ||
Once the registration file is generated it can be opened and manually edited as needed. PLEASE NOTE when the registration file is opened to make changes, any leading zeros will be dropped if they are present within columns in Excel. Those leading zeros will need to be added back if any are removed in order for the file to successfully process. Please follow the steps below as needed to return any leading zeros: Highlight the entire column that contains data where leading zeros would need to be added Right-click in the highlighted area and choose Format Cells In the Category, select Custom In the Type section, the word General will be in a text box, and also highlighted underneath Click inside the text box (NOT the field with the items listed), delete out the word General and type in as many zeros as the field should contain. These act as a placeholder for the number of characters needed in the field.
Once the updates are completed, save your document as .csv and then proceed with uploading the file for student registration. |
| Expand | ||
|---|---|---|
| ||
I. Accessing the EOC Tracker- District Management  Step 1. From District Management, click on the Students Tab Step 2. The link to the EOC Tracker is in the upper right-hand corner of the Student Tab Table II. Filtering Students 
Filtering Directions Filtering a group of students can be done with a variety of options. The district has the option to Filter and Export All Students, or All Students served by a program, Select a Campus, choose from Grades, Programs, and get a more specific list of students. Step 1: Select a Campus Step 2: Select a grade level or leave at Select to Show All Students Step 3: Select from the different programs (SPED, LEP, 504, GT) to filter out students in the special programs Step 4: If wanting to view the students that have failed or are missing an EOC, check this box. Step 5: The filter can be used at any time after any of the selections are made. All boxes do not have to be populated to be able to filter. (Ex. If you only want to view students served by Sped, just use the Program filter and select Filter) Step 6: Any filtered view can also be exported to Excel III. Title Bar Filtering Multiple filters can be done. Click on the Title (Sped) and a list will be generated that brings all of the Sped Students to the top, if you select Sped again, it will re-sort them to the bottom of the list. The LEP option can then be selected to bring to the top, students that are Sped and LEP. The tests can also be sorted to show blanks at the top, to indicate a missing score/test.  |
| Expand | |||||||||
|---|---|---|---|---|---|---|---|---|---|
| |||||||||
Utilizing TestHound with TIDE system/Reports STAAR 3-8 and STAAR EOC Assessments *Verify the Accommodation Associations have been configured. To properly identify paper-based and computer-based test-takers and accommodations, the Accommodation Association must be configured to properly generate the Registration file and Test Attribute/Accommodation Report. All Student Registration File Click Here for a Video on How to Pull a Students Registration File If you are not using Performance Tracker to pull the registration file, you can add the EOC flags to students using the Eligibility reports offered under district reports. Students must be in a test for the report to generate. Test Attributes/Accommodations Report Students must be in a test in the system for this report to generate. Under District Management, go to Reports, select Test Attributes, click Request Test Attributes, choose Administration, and format=Test Attributes, then hit Request.
TIDE Roster Report (optional) Under District Management, go to Reports, select TIDE Roster Report, choose applicable campuses, test administration, and Test(s), then Generate Report. Export the report in Excel format then upload it into TIDE. This report will help campuses to print tickets by room in TIDE. STAAR Non Emedded Supports Under District Management or Campus Management, go to Reports, select STAAR Non Embedded Supports Report, choose applicable campuses, test administration, and Test(s), then Generate Report. Export the report in Excel format then upload it into TIDE. This is for STAAR/EOC only, not alternate assessments. Interim AssessmentsAdding Students to a Test Administration Using the default Multi-Session Schedule interface, configure the test administration schedule, and add students to each applicable test. Student Registration File Under District Management, go to Performance Tracker, click on Registration File link, click on the Request Registration link, select Test Admin , then click the Request button. Download the Registration file, unzip using 7-Zip, the upload it to TIDE. If using TestHound’s Registration file, this is all you need. Step 4: End of Course Eligibility Report If you use your SIS Registration file: Under District Management, go to Reports, select End of Course Eligibility Report, choose applicable campuses and EOC test administration, then Generate Report. Export the report in Excel format then upload it into TIDE. Interim Off-Grade Level Report, STAAR Above Grade Report Under District Management, go to Reports, select Interim AboveGrade Level/EOC Interim Report, choose applicable campuses, test administration, and Test(s), then Generate Report. Export the report in Excel format then upload it into TIDE. Test Attributes/Accommodations Report Under District Management, go to Reports, select Test Attributes/Accommodations Report, choose applicable campuses, test administration, and Test(s), then Generate Report. Export the report in Excel format then upload it into TIDE. TIDE Roster Report (optional) Under District Management, go to Reports, select TIDE Roster Report, choose applicable campuses, test administration, and Test(s), then Generate Report. Export the report in Excel format then upload it into TIDE. This report will help campuses to print tickets by room in into TIDE. STAAR Non Emedded Embedded Supports Under District Management or Campus Management, go to Reports, select STAAR Non Embedded Supports Report, choose applicable campuses, test administration, and Test(s), then Generate Report. Export the report in Excel format then upload it into TIDE. This is for STAAR/EOC only, not alternate assessments. Interim AssessmentsAdding Students to a Test Administration Using the default Multi-Session Schedule interface, configure the test administration schedule, and add students to each applicable test. Student Registration File Under District Management, go to Performance Tracker, click on Registration File link, click on the Request Registration link, select Test Admin , then click the Request button. Download the Registration file, unzip using 7-Zip, the upload it to TIDE. If using TestHound’s Registration file, this is all you need. Step 4: End of Course Eligibility Report If you use your SIS Registration file: Under District Management, go to Reports, select End of Course Eligibility Report, choose applicable campuses and EOC test administration, then Generate Report. Export the report in Excel format then upload it into TIDE. Interim Off-Grade Level Report, STAAR Above Grade Report Under District Management, go to Reports, select Interim AboveGrade Level/EOC Interim Report, choose applicable campuses, test administration, and Test(s), then Generate Report. Export the report in Excel format then upload it into TIDE. Test Attributes/Accommodations Report Under District Management, go to Reports, select Test Attributes/Accommodations Report, choose applicable campuses, test administration, and Test(s), then Generate Report. Export the report in Excel format then upload it into TIDE. TIDE Roster Report (optional) Under District Management, go to Reports, select TIDE Roster Report, choose applicable campuses, test administration, and Test(s), then Generate Report. Export the report in Excel format then upload it into TIDE. STAAR Non Embedded Supports Under District Management or Campus Management, go to Reports, select STAAR Non Embedded Supports Report, choose applicable campuses, test administration, and Test(s), then Generate Report. Export the report in Excel format then upload it into TIDE.
| |||||||||
| Expand | |||||||||
| |||||||||
I. Accessing the Upload Exclusion feature 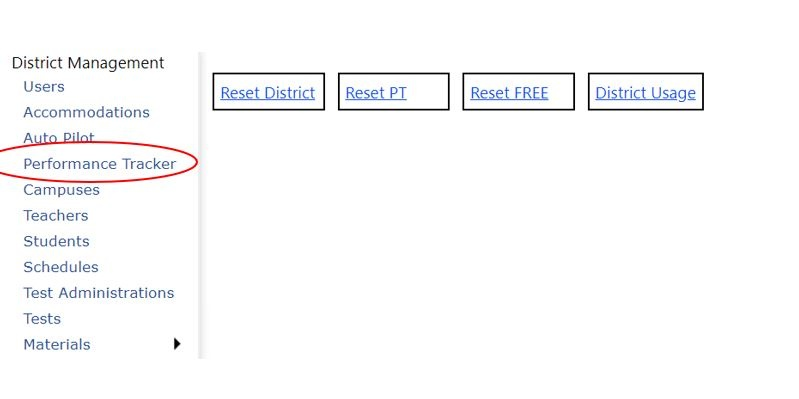 Step 1. From the District Management Screen, Click on Performance Tracker. 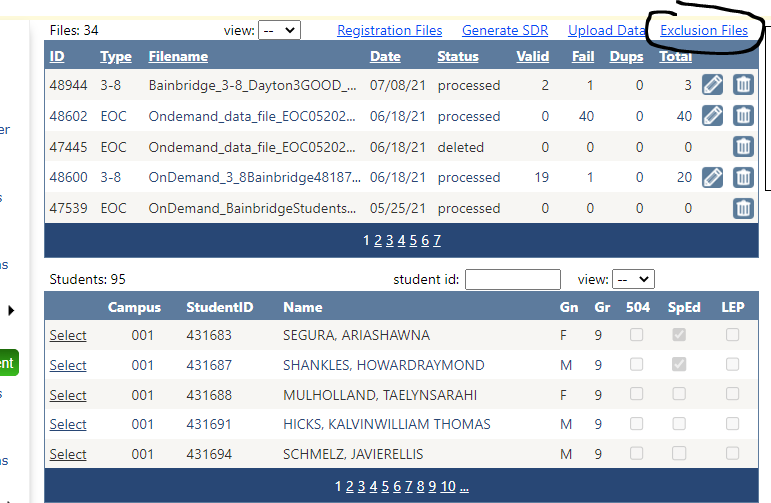 Step 2. Click on Exclusion Files in the upper right corner. II. When creating a template to upload-it is helpful to name your files uniquely so they are easily identifiable later. You can download our template here or skip to step 4 to build your own. Step 3. Download the template and populate it with the necessary fields
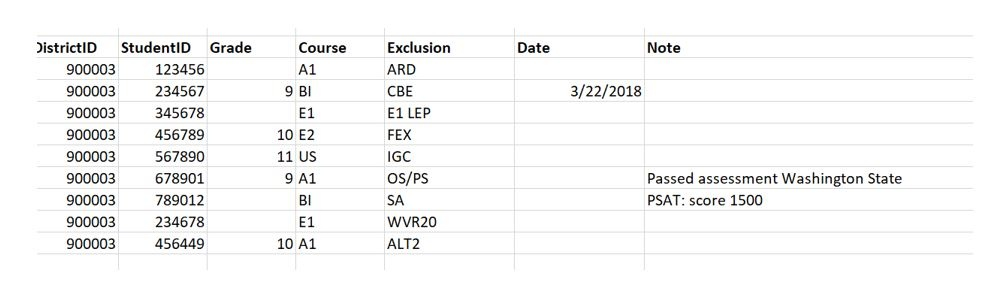
Step 4. Or in an Excel Spreadsheet, create the column headers- (this is beneficial if a spreadsheet has already been created for some fields). DistrictID StudentID Grade Course Exclusion Date Note III. Column Header-no spaces in the header titles  IV. Field Descriptions | Column Definitions | ||||||||
DistrictID | Required; State defined six-digit DistrictID, no dashes or spaces | ||||||||
StudentID | Required; District's local StudentID; 1-10 digits in length, no dashes or spaces-please NO PEIMS IDs | ||||||||
Grade | Optional; integer values 3-12; [Note: required for STAAR exclusions] | ||||||||
Course | Required; allowed values: A1, BI, E1, E2, US | Exclusion | |||||||
Date | Optional; allowed format mm/dd/yyyy; represents the date of the exclusion | ||||||||
Note | Optional; description or notes concerning the exclusion; 500 characters maximum | Courses | |||||||
A1 | Algebra I | ||||||||
BI | Biology | ||||||||
E1 | English I | ||||||||
E2 | English II | ||||||||
US | U.S. History | Exclusions | |||||||
ALT2 | STAAR Alternate 2 | ||||||||
ARD | EOC ARD Exempt – Special Education | ||||||||
CBE | Credit-by-Exam (CBE) | ||||||||
E1 LEP | English I Special Provision – LEP (Limited English Proficient) | ||||||||
FEX | Foreign Exchange | ||||||||
IGC | IGC – Individual Graduation Committee | ||||||||
OS/PS | Out of State or Private School | ||||||||
SA | Substitute Assessment | ||||||||
WVR20 | Waived-CVD 19 | ||||||||
| Expand | |||||||||||||||||||||||||||||||||||||||||||||||||||||||||||||||||||||||||||||
|---|---|---|---|---|---|---|---|---|---|---|---|---|---|---|---|---|---|---|---|---|---|---|---|---|---|---|---|---|---|---|---|---|---|---|---|---|---|---|---|---|---|---|---|---|---|---|---|---|---|---|---|---|---|---|---|---|---|---|---|---|---|---|---|---|---|---|---|---|---|---|---|---|---|---|---|---|---|
| |||||||||||||||||||||||||||||||||||||||||||||||||||||||||||||||||||||||||||||
I. Accessing the Upload Exclusion feature Step 1. From the District Management Screen, Click on Performance Tracker. Step 2. Click on Exclusion Files in the upper right corner. II. When creating a template to upload-it is helpful to name your files uniquely so they are easily identifiable later. You can download our template here or skip to step 4 to build your own. Step 3. Download the template and populate it with the necessary fields
Step 4. Or in an Excel Spreadsheet, create the column headers- (this is beneficial if a spreadsheet has already been created for some fields). DistrictID StudentID Grade Course Exclusion Date Note III. Column Header-no spaces in the header titles IV. Field Descriptions
V. Upload the Data Step 1. Save the spreadsheet as a CSV (Comma-delimited-.csv) Note to Mac users: When saving the file, instead of choosing Save As CSV (Comma delimited), there should be an option for CSV UTF-8 (Comma delimited). Saving it with that format will prevent upload errors associated with the file format. Step 2. Click on the Upload Exclusions link. 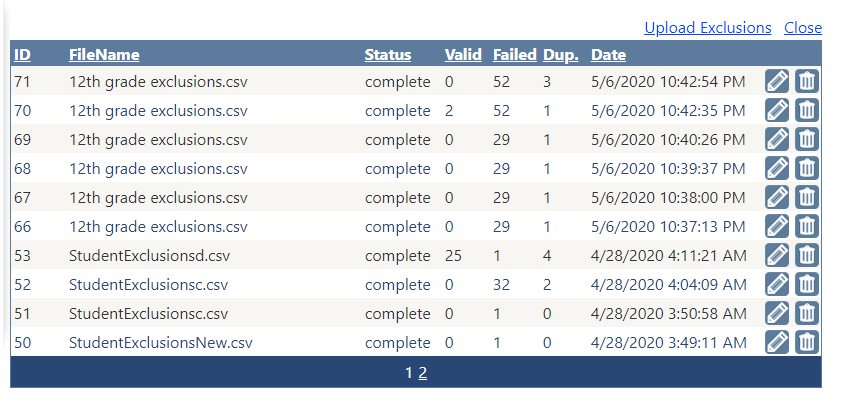 Step 3. Upload the .CSV file 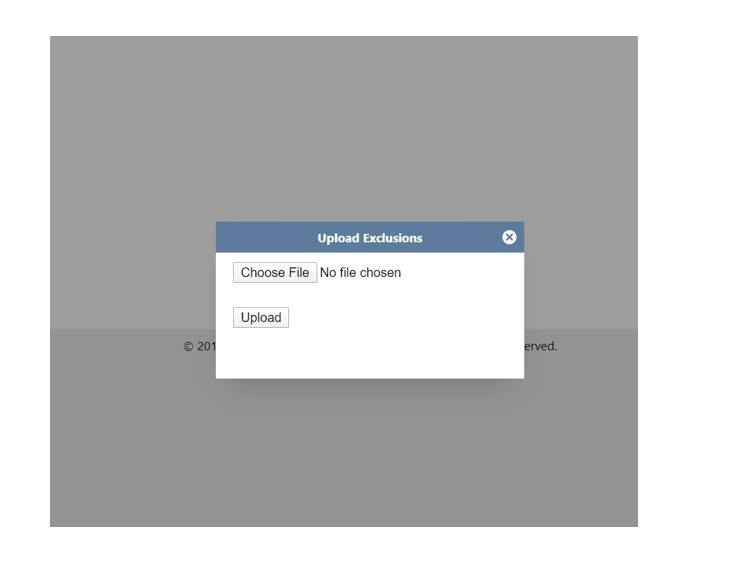 Step 4. When clicking on a student’s name, go to the Student Details Page (under Campus Management), the contents of the file will be applied to each student contained in the file. 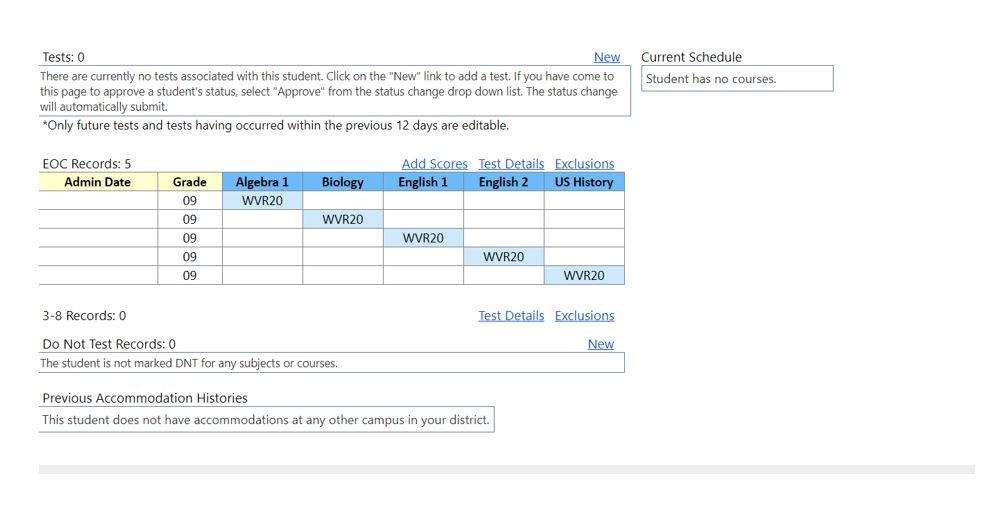 Step 5. After uploading the file, check for errors and duplicates by clicking on the Upload Exclusions button. Then the pencil beside the uploaded file. A list of duplicate records and invalid student IDs will be listed below.  Errors  Files can also be deleted to remove data from all students in the file, in case of errors, and then corrected and reloaded. | |||||||||||||||||||||||||||||||||||||||||||||||||||||||||||||||||||||||||||||
| Expand | ||
|---|---|---|
| ||
Districts that have access to the Add Scores feature can manually add a test score to a student. To add a test score first navigate to the student’s profile page. Then click Add Scores. 
 |
| Expand | ||
|---|---|---|
| ||
A score that has been previously added to a students profile can be updated manually. To manually edit a score click Test Details.  Then find the score that needs editing. You can select different page numbers to see different scores. Look for the subject of the scale score that needs to be changed.
Next click on the edit button.  Place your cursor next to the score that needs changing and edit the scale score.  Then click the Update button.  You can also delete a score that is associated with an incorrect student. click the edit button and delete the students id number. |
