This page will show the TestHound components available on the student page and how the CTC can use this page.
Edit Existing Students:
To edit existing students, click on the pencil icon on the line of the student you wish to make changes to.

You will be able to edit the following fields:
-First Name, Middle Name or Initial, and Last Name
-Enrollment status
-Gender
-Grade -Check the appropriate special programs for the student: 504, Special Education, LEP
*Please note that any changes made will be overridden by the district uploads and should be corrected in your SIS to ensure accurate information is uploaded to TestHound.
Searching for a student:
To search for a student, select Search from the top of the Students screens on the right side. A search window will open at the top of the Student's table.

-You can enter the local Student ID or State Student ID number or Student Name: to perform a search by student name, only a last name is required.

Add new students:
To add a new student, select New from the top right side of the Students screen. After clicking on New, you will be prompted to enter:
-The student’s local ID- Be sure the student ID matches what is entered in your SIS
-The State Student ID- for TX this is the TSDS, for FL it is the FLEID and for TN it is the TN ID
-First Name, Middle Name or Initial, and Last Name
-Gender
-Grade
-Check the appropriate special programs for the student: 504, Special Education, or LEP
Click Submit

This information will be updated when TestHound and your SMS update in the nightly feed.
Re-enroll students:

After clicking on Re‐enroll, you will be prompted to enter the local student ID of the student you wish to re‐enroll on your campus.

To access the Student View or student dashboard, select a student name from the Students list by clicking on their name highlighted in blue. After selecting a student name from the Students list, you will be able to view:

Student information:
-The student 504, SPED, and LEP data is viewed only on this page.
-This page will also identify when the last change was made to a student profile.
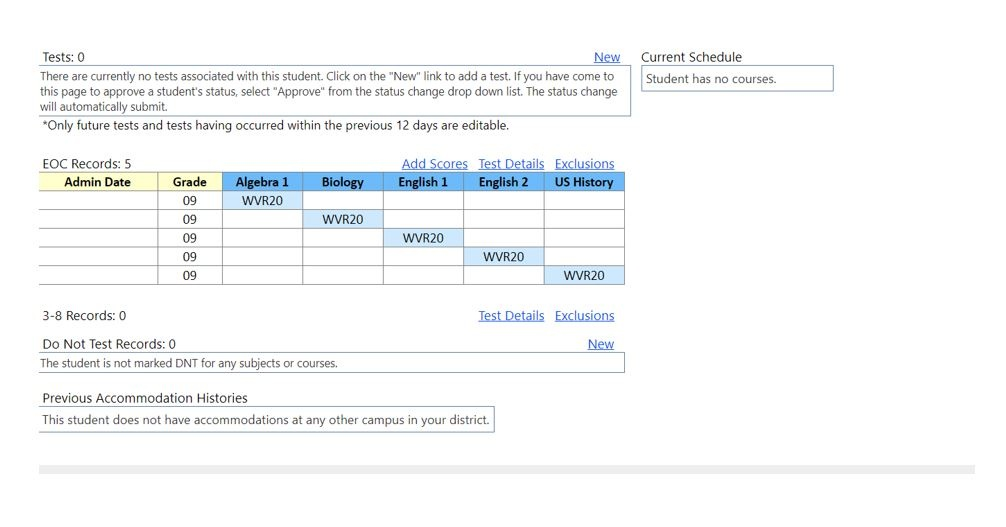
You will be able to see if a student has a current test assignment. Students can be assigned as a group to a test here or within the test itself. To add a test assignment to a student individually, select
New. Next, select the Test Administration, the test, and the room you would like to add the student in and click submit.
Previous Accommodations:
You will be able to see if a student has any previous accommodations. To view either the accommodations, select View. Selecting View under Previous Accommodation Histories will give you a screen that lists all accommodations that were previously entered for the student.


-Accommodation History – New Students Only (within an alert category)
For students who are new to your campus, you have the ability to pull student accommodations and test versions if those students were in your district the previous year. This feature will only be accessible to districts that have used TestHound previously. To begin the process of pulling student accommodations, click Accommodation Histories above the student table.
A new screen will appear with text describing the process of pulling student accommodations and test versions. You may choose to either:
Preview the list of students that will be affected
Cancel and individually enter student accommodations
Proceed and pull students' accommodations without previewing the data
If you select Preview from the Accommodations Histories screen, a list of students who will be affected is displayed. The last two columns of the table will identify whether the student has accommodations history.

To pull the student's accommodations, click Submit.

Student schedule:
-The student schedule cannot be altered but will show you the latest version of the schedule pulled from the district SMS
Student Test History (for districts that have purchased Performance Tracker TX Only):
If your district subscribes to Performance Tracker, a 3-8 or EOC table will be displayed with the student's test history based on STAAR files uploaded by the DTC. Column headings will be color-coded based on whether the student Met Std (green), Std Not Met (red), Exclusion (blue) or if the student did not have a score code of "S" the cell with the student data will now reflect the score code that was assigned to the student (gray). For instance, a student with a score code of "A" will have SC-A displayed, or a score code of "O" will be displayed as SC-O.

The accommodations pull is a tool meant to facilitate the transfer of accommodations from one campus to another campus within the same district. This tool is useful when your district has not subscribed to Auto Pilot.
When you log in to TestHound, you will click on Students->Accommodation Histories.

This will bring you to a list of all students at your campus that have accommodation histories.

Next, you can click on a student’s name, and the campuses where they currently have accommodation history files will appear.

Click “View” on the line of the most recent campus, choose to fill in “Include Student Notes” if you wish, then “Pull”. The student’s most recent accommodations will be pulled into your campus.

The list will shrink as you progress, allowing you to check each student’s accommodations individually as you go. This best practice assures that all incoming students start the year with the correct accommodations in place and allows you to be aware of any needs those students may have as early as possible.
To manually enter accommodations for students, start by clicking on the triangle next to the student's name.

Choose the appropriate subject for the accommodations from the subject dropdown menu.

Click in the box next to the appropriate accommodation specific to the student. The screen will flash indicating the accommodation change has been saved.
Notes maybe be entered in the "notes" box at the top of the accommodation page.

If it is necessary to reset accommodations for the student, you may do so by clicking the "reset all" box and choosing the appropriate selections, and submitting.


Accommodations for each subject must be entered in the appropriate subject from the dropdown.
You have access to the demographic information associated with the students on your campus. This is the data that TestHound is receiving for your district and is utilized when processing past performance data, registration files, and SDR files at the district level.
As a campus user, you can verify this demographic data for students so that you can check their registration associations directly in TestHound. The bar above each code option has an info icon that will show you what each field means in reference to the registration options.

I. Accessing the EOC Tracker- Campus Management

Step 2. The link to the EOC Tracker is in the upper right-hand corner of the Student Tab Table
II. Filtering Students


Filtering Directions
Filtering a group of students can be done with a variety of options.
The district has the option to Filter and Export All Students, or All Students served by a program, or Select a Campus, choose from Grade, Program, and get a more specific list of students.
Step 1: Select a campus.
Step 2: Select a grade level or leave at Select to Show All Students.
Step 3: Select from the different programs (SPED, LEP, 504, GT) to filter out students in the special programs.
Step 4: If wanting to view the students that have failed or are missing an EOC, check this box.
Step 5: The filter can be used at any time after any of the selections are made. All boxes do not have to be populated to be able to filter. (Ex. If only want to view students served by Sped, just use the Program filter and select Filter).
Step 6: Any filtered view can also be exported to Excel.
III. Title Bar Filtering
Multiple filters can be done.
Click on the Title (Sped) and a list will be generated that brings all of the Sped Students to the top, if you select Sped again, it will report them to the bottom of the list.
The LEP option can then be selected to bring to the top, students that are Sped and LEP.
The tests can also be sorted to show blanks at the top, to indicate a missing score/test.

IV. EOC Worksheet
The EOC worksheet will include the performance history of each EOC as well as any exclusions that have been uploaded. To download an EOC worksheet for a single student, type the student’s local id number in the space next to the title EOC worksheet and select the download icon. To download a group of EOC worksheets by alpha, click the alpha, example A-D. The pages will download in alpha order with the performance history of one student per page. This report pull performance history from scores and exclusions uploaded to Performance Tracker.

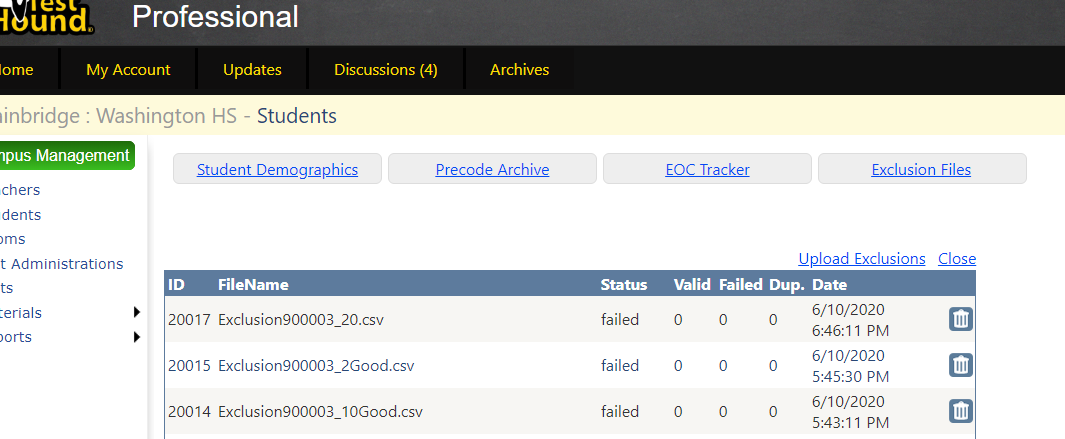
I. Accessing the Upload Exclusion feature

Step 2. Click on Exclusion Files in the upper right corner.
II. Creating a template to upload-please name your files uniquely so they are easily identifiable later.
Step 3. Download the template and populate it with the necessary fields
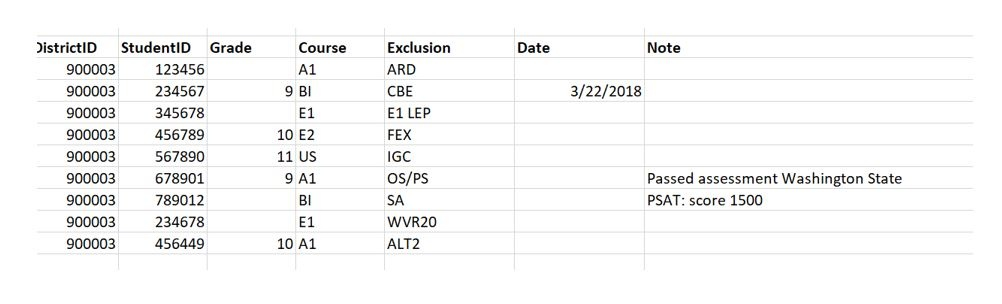
DistrictID
StudentID
Grade
Course
Exclusion
Date
Note
III. Column Header-no spaces in the header titles

Column Definitions | ||
DistrictID | Required; State defined six digit DistrictID, no dashes or spaces | |
StudentID | Required; District's local StudentID; 1-10 digits in length, no dashes or spaces-please NO PEIMS IDs | |
Grade | Optional; integer values 3-12; [Note: required for STAAR exclusions] | |
Course | Required; allowed values: A1, BI, E1, E2, US | |
Exclusion | Required; allowed values: ALT2, ARD, CBE, E1 LEP, FEX, IGC, OS/PS, SA,WVR20-each exclusion will need it's own line of student data. Students will be listed multiple times for multiple exclusions | |
Date | Optional; allowed format mm/dd/yyyy; represents the date of the exclusion | |
Note | Optional; description or notes concerning the exclusion; 500 characters maximum | |
Courses | |
A1 | Algebra I |
BI | Biology |
E1 | English I |
E2 | English II |
US | U.S. History |
Exclusions | ||
ALT2 | STAAR Alternate 2 | |
ARD | EOC ARD Exempt – Special Education | |
CBE | Credit-by-Exam (CBE) | |
E1 LEP | English I Special Provision – LEP (Limited English Proficient) | |
FEX | Foreign Exchange | |
IGC | IGC – Individual Graduation Committee | |
OS/PS | Out of State or Private School | |
SA | Substitute Assessment | |
WVR20 | Waived-CVD 19 | |
V. Upload the Data
Step 1. Save the spreadsheet as a CSV (Comma-delimited-.csv)Note to Mac users: When saving the file, instead of choosing Save As CSV (Comma delimited), there should be an option for CSV UTF-8 (Comma delimited). Saving it with that format will prevent upload errors associated with the file format.
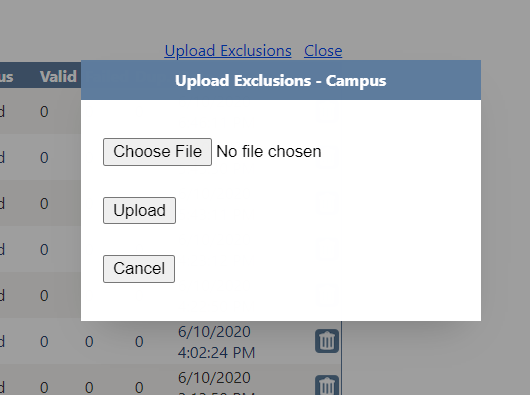
Step 2. Click on the Upload Exclusions link.
Step 3. Upload the . CSV file
Step 4. When clicking on a student’s name, go to the Student Details Page (under Campus Management), the contents of the file will be applied to each student contained in the file.
Step 5. After uploading the file, check for errors and duplicates by clicking on the Upload Exclusions button. Then the pencil beside the uploaded file. A list of duplicate records and invalid student IDs will be listed below.

Errors
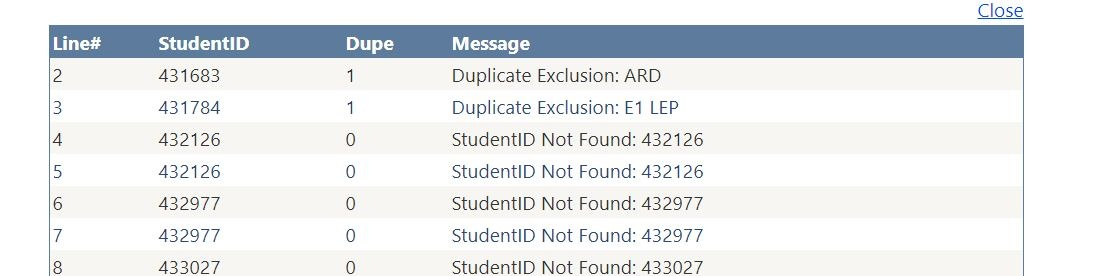
Data can be corrected manually by clicking on the student's name and editing in the PT table or the file can be deleted to remove the data from all students in the file, the file can be corrected, and then reloaded.
To enter a test exclusion manually for a student, click on the student’s name link.
Pick the appropriate exclusions link for either entering an EOC or 3-8 exclusion.

Once you have selected the appropriate record/exclusion, select the new link.

If you have selected the EOC exclusion, you will be prompted to select the appropriate grade, course, and type for the exclusion. Enter a date, as well as any notes needed for the exclusion, then click on submit.

Exclusions will be color coded in blue on the student’s page, as well as in the Student PT Summary report.

If you would like to identify students that are excluded and do not need to test you can click, the New link located to the right of Do Not Test Records.

Next, select the Course, or Subject.

Notes are optional. If needed notes can be written in the notes box. Then click Submit.

Once added, the record will show on the individual student page and a Student DNT Report can be pulled in the Reports section.

Select the pencil icon to edit or the trash can to remove the DNT record.